
Problem 1: Read the Main Program
The main program can be split into approximately five steps, which we will discuss one at a time. Read the comments in the code that describe what each part of the file does, starting at the comment: "The main program begins here". The steps in the main program (see the comments: “Step A”, “Step B”, etc.) are roughly:
- Step A: Process command line arguments - tell the user if they have not given the correct number of arguments to the program, otherwise get the name of the
input_filefrom the user arguments. - Step B: Read the file - Determine the type of
input_filebased on its file extension (.txt,.png), and read the file contents into a grid of pixels stored as a list of lists of integers. - Step C: Generate the output file names - based on the name of the
input_file, create the strings that will be used as the names for the output files. The program will write the blurred image to a file in two formats: as a.pngimage you can open in any image viewer and as a.txtfile containing a comma separated list of the integer values in the grid. This text file will be useful for debugging your program.
Later, you will add code for the remaining two steps in the main program:
- Step D: Apply the algorithm - Apply the blur algorithm to the grid of pixels you read into the variable
input_gridin step B. - Step E: Output the grid - Write the blurred grid of pixels to the two output file names you created in step C.
In order to complete steps D and E above you will need to call some of the functions in this file. Below is a brief guide to the functions in the file.
The Functions
Some of these functions are given to you and you do not need to modify them at all, some you need to implement.
Functions that you must implement
You are required to implement the functions listed in this table:
| Function Header | Function Description |
|---|---|
get_pixel_at(pixel_grid, i, j) |
Returns the pixel in pixel_grid at row i and column j (zero-indexed). Returns 0 if there is no row i or no column j, or if i or j are negative. Note: We are NOT allowing negative indexing into our pixel_grids. |
average_of_surrounding(pixel_grid, i, j) |
Returns the (unweighted) average of the values of the pixel at row i and column j and the eight pixels surrounding it in the given pixel_grid. |
blur(pixel_grid) |
Given pixel_grid (a rectangular grid of pixels), returns a new grid of pixels of the same size and shape, that is the result of blurring pixel_grid. In the output grid, each pixel is the (unweighted) average of that pixel and its eight neighbors in the input grid. Note: This function should create a new grid and return it. It should not modify the original grid. |
read_grid(file_path) |
Reads the CSV file at file_path into a rectangular grid of pixels, represented as a list of lists of integers. This method should be able to read any file written by the write_grid function. Returns the grid of pixels. |
Functions you are given to read and write files
You do NOT need to modify these three functions. You do NOT need to know how these functions work, you just need to understand what they do.
read_image(file_path)- Reads the image file atfile_pathinto a rectangular grid of pixels, represented as a list of lists of integers. Each element of the outer list is one row of pixels, where each pixel is an integer x such that 0 <= x < 256. Returns the grid of pixels.write_image(file_name, pixel_grid)- Givenpixel_gridas an image in a list of lists of integers format, write it to the filename file_name as an image.write_grid(file_name, pixel_grid)- Givenpixel_gridas an image in a list of lists of integers format, write it to the filename file_name in CSV format.
Other functions
You will also notice a few more functions in the file. We will describe these in more detail in Problems 2-5. You do NOT need to modify these three functions. You do NOT need to know how these functions work, you just need to understand what they do.
csv_line_to_list(line)- Given a CSV-formatted row of integers, returns the integers as a list of integers. You will need to call this function in your implementation ofread_grid.test_get_pixel_at()- Basic, brief sanity checks forget_pixel_at.test_average_of_surrounding()- Basic, brief sanity checks foraverage_of_surrounding.
The Pixel Grid
Note that several places above we refer to a “grid of pixels”. This is how we represent the image in our program. As described in the background section, the black and white images we are using can be thought of as a rectangular grid of pixels, where each pixel is represented by an integer between 0 and 255.
Inside of our program we will represent this grid as a list of lists of integers. The first (outer) list will be a list of rows of the grid. The length of this list is the “height” of the grid. Each row of the grid will be represented as a list of integers. Each row will be the same length. So the length of any one of these rows is the “width” of the grid. For example, consider the following pixel grid:
1  5  61
4  3  2
10 11 100
The grid would be represented by the following list:
[ [1, 5, 61], [4, 3, 2], [10, 11, 100] ]
Here is another example pixel grid and the list that would represent it:
1   2   3   4   5
6   7   8   9   10
11  12  13  14  15
[ [ 1, 2, 3, 4, 5 ], [ 6, 7, 8, 9, 10], [ 11, 12, 13, 14, 15] ]
Assuming this list was assigned to the variable grid, to access the pixel in the top left corner (containing the value 1), you would say: grid[0][0]. To access the value in the bottom right corner (containing the value 15) you would say: grid[2][4].
Note
We will not allow accessing the grid using negative indexes (something that Python’s list allows).
The File Formats
The program you are given will read in black and white image files in a .png format. It will apply the blur algorithm to the given image and write the blurred image to two output files. One output file will be in .png format that can be opened in any image viewer. The other output file will be a text file (with file extension .txt) in CSV (Comma-Separated value) format.
After you implement the read_grid function, your program will also be able to read input files in the same CSV format that the program produces. We have provided a few small sample files in this format in the test_grids folder. The purpose of supporting the reading and writing of files in this CSV format is to facilitate testing your program. While it might be hard to look at a blurred image in an image viewer and tell if you have done your calculations exactly right, this should be easy to do on small files in the CSV format. For example, the contents of the CSV file small_grid.txt and the CSV file containing the result of applying the blur algorithm to that grid are shown below. Note the commas between elements.
small_grid.txt:
0,   0,   0
0,   9,   0
0,   0,   0
small_grid_blur_grid.txt:
1,   1,   1
1,   1,   1
1,   1,   1
Feel free to create your own text files in this same CSV format for testing purposes. There is no code to write for this problem.
Problem 2: Implement the Blurring Algorithm
For this problem, you need to implement the three function bodies related to blurring an image:
get_pixel_at(pixel_grid, i, j)average_of_surrounding(pixel_grid, i, j)blur(pixel_grid)
We suggest you implement them in that order. Below are some specifics about each of these functions. In particular, blur should call average_of_surrounding, and average_of_surrounding should call get_pixel_at. Note that the smallest possible pixel_grid is one that contains a single pixel (e.g. [ [1] ]). You can assume that you will never be given a pixel_grid smaller than this.
get_pixel_at
This function should return the pixel in pixel_grid at row i and column j or 0 if there is no row i or no column j. This function can be done in about 4-6 lines of code, although it is fine if yours is slightly longer.
The function test_get_pixel_at() can be used to test that you have implemented get_pixel_at correctly. test_get_pixel_at() uses the assert statement.
Notice that there is already a commented out call to test_get_pixel_at() immediately after its definition. Un-comment the call to test_get_pixel_at(). The way our program is written, as soon as get_pixel_at and test_get_pixel_at have been defined, the function test_get_pixel_at() will be called. Try running your program as described above and pay close attention to notice if any test cases fail, which will look something like this:

test_get_pixel_at() creates a test pixel grid and executes a sequence of assert statements. Assert statements check to make sure things that should be true actually are true, such as get_pixel_at(test_grid, 0, 0) == 1. If any of the assertions in test_get_pixel_at() fail, an error message will be printed. If you see such a message this means that you have not implemented get_pixel_at correctly. Look at the test_grid in test_get_pixel_at and the message printed to figure out what is wrong with your implementation of get_pixel_at.
average_of_surrounding
This function should return the average of the values of: the pixel at location i,j and the eight pixels surrounding it in the given pixel_grid. This is the algorithm described in the background section. In the code we have given you, we expect you to sum the nine pixels into the variable pixel_sum and divide it by 9 using truncating integer division with the Python 3 // operator. You should not change this line of the code; this is how we intend for the average to be calculated. You will probably need to add anywhere from 6-10 lines of code to this function. It can be done using loops; however, for this homework using loops is not required.
The function test_average_of_surrounding is similar to test_get_pixel_at(). It can be used to do some basic checks to test that you have implemented average_of_surrounding correctly. Un-comment the call to test_average_of_surrounding() now. Try running your program as described above and pay close attention to notice if any test cases fail. If your tests pass, there will be no additional output in your terminal window.
blur
Given a pixel_grid (a rectangular grid of pixels), blur should return a new grid of pixels of the same size and shape. For each pixel in the given pixel_grid, you should compute its average and store it in the same location in the new grid you are creating. Finally, you should return the new grid. You will probably need to add anywhere from 8-15 lines of code to this function. We strongly recommend starting with an empty list and appending new values to the list to create your new grid, as other approaches (e.g. copying) are likely to result in hard to track down bugs. We have given you a new list, blurry_grid, to start with.
Here is a sample pixel_grid and the new blurred grid that should be returned:
pixel_grid
[[1, 2, 3], [4, 5, 6], [7, 8, 9]]
new blurred grid
[[1, 2, 1], [3, 5, 3], [2, 4, 3]]
There is no test function provided for blur. You may write one if you wish, using the two test functions above as models. Writing a test function for blur is not required but we encourage you to get in the practice of writing test functions. You can examine the output of your blurring algorithm visually after you have finished Problem 3 below. You won’t know whether you have blurred the image exactly according to the algorithm until after you have finished Problem 4 and can compare the output of small blurred test_grids.
After you have implemented blur and are convinced that get_pixel_at and average_of_surrounding are working properly, move on to Problem 3.
Problem 3: Write the Main Program Code
For this problem you must replace the two comments in the main program with code that will implement step D (apply the blur algorithm) and step E (write the results to two output files). We suggest re-reading the discussion of the main program. This should consist of a small number of lines of code (3-5 lines total).
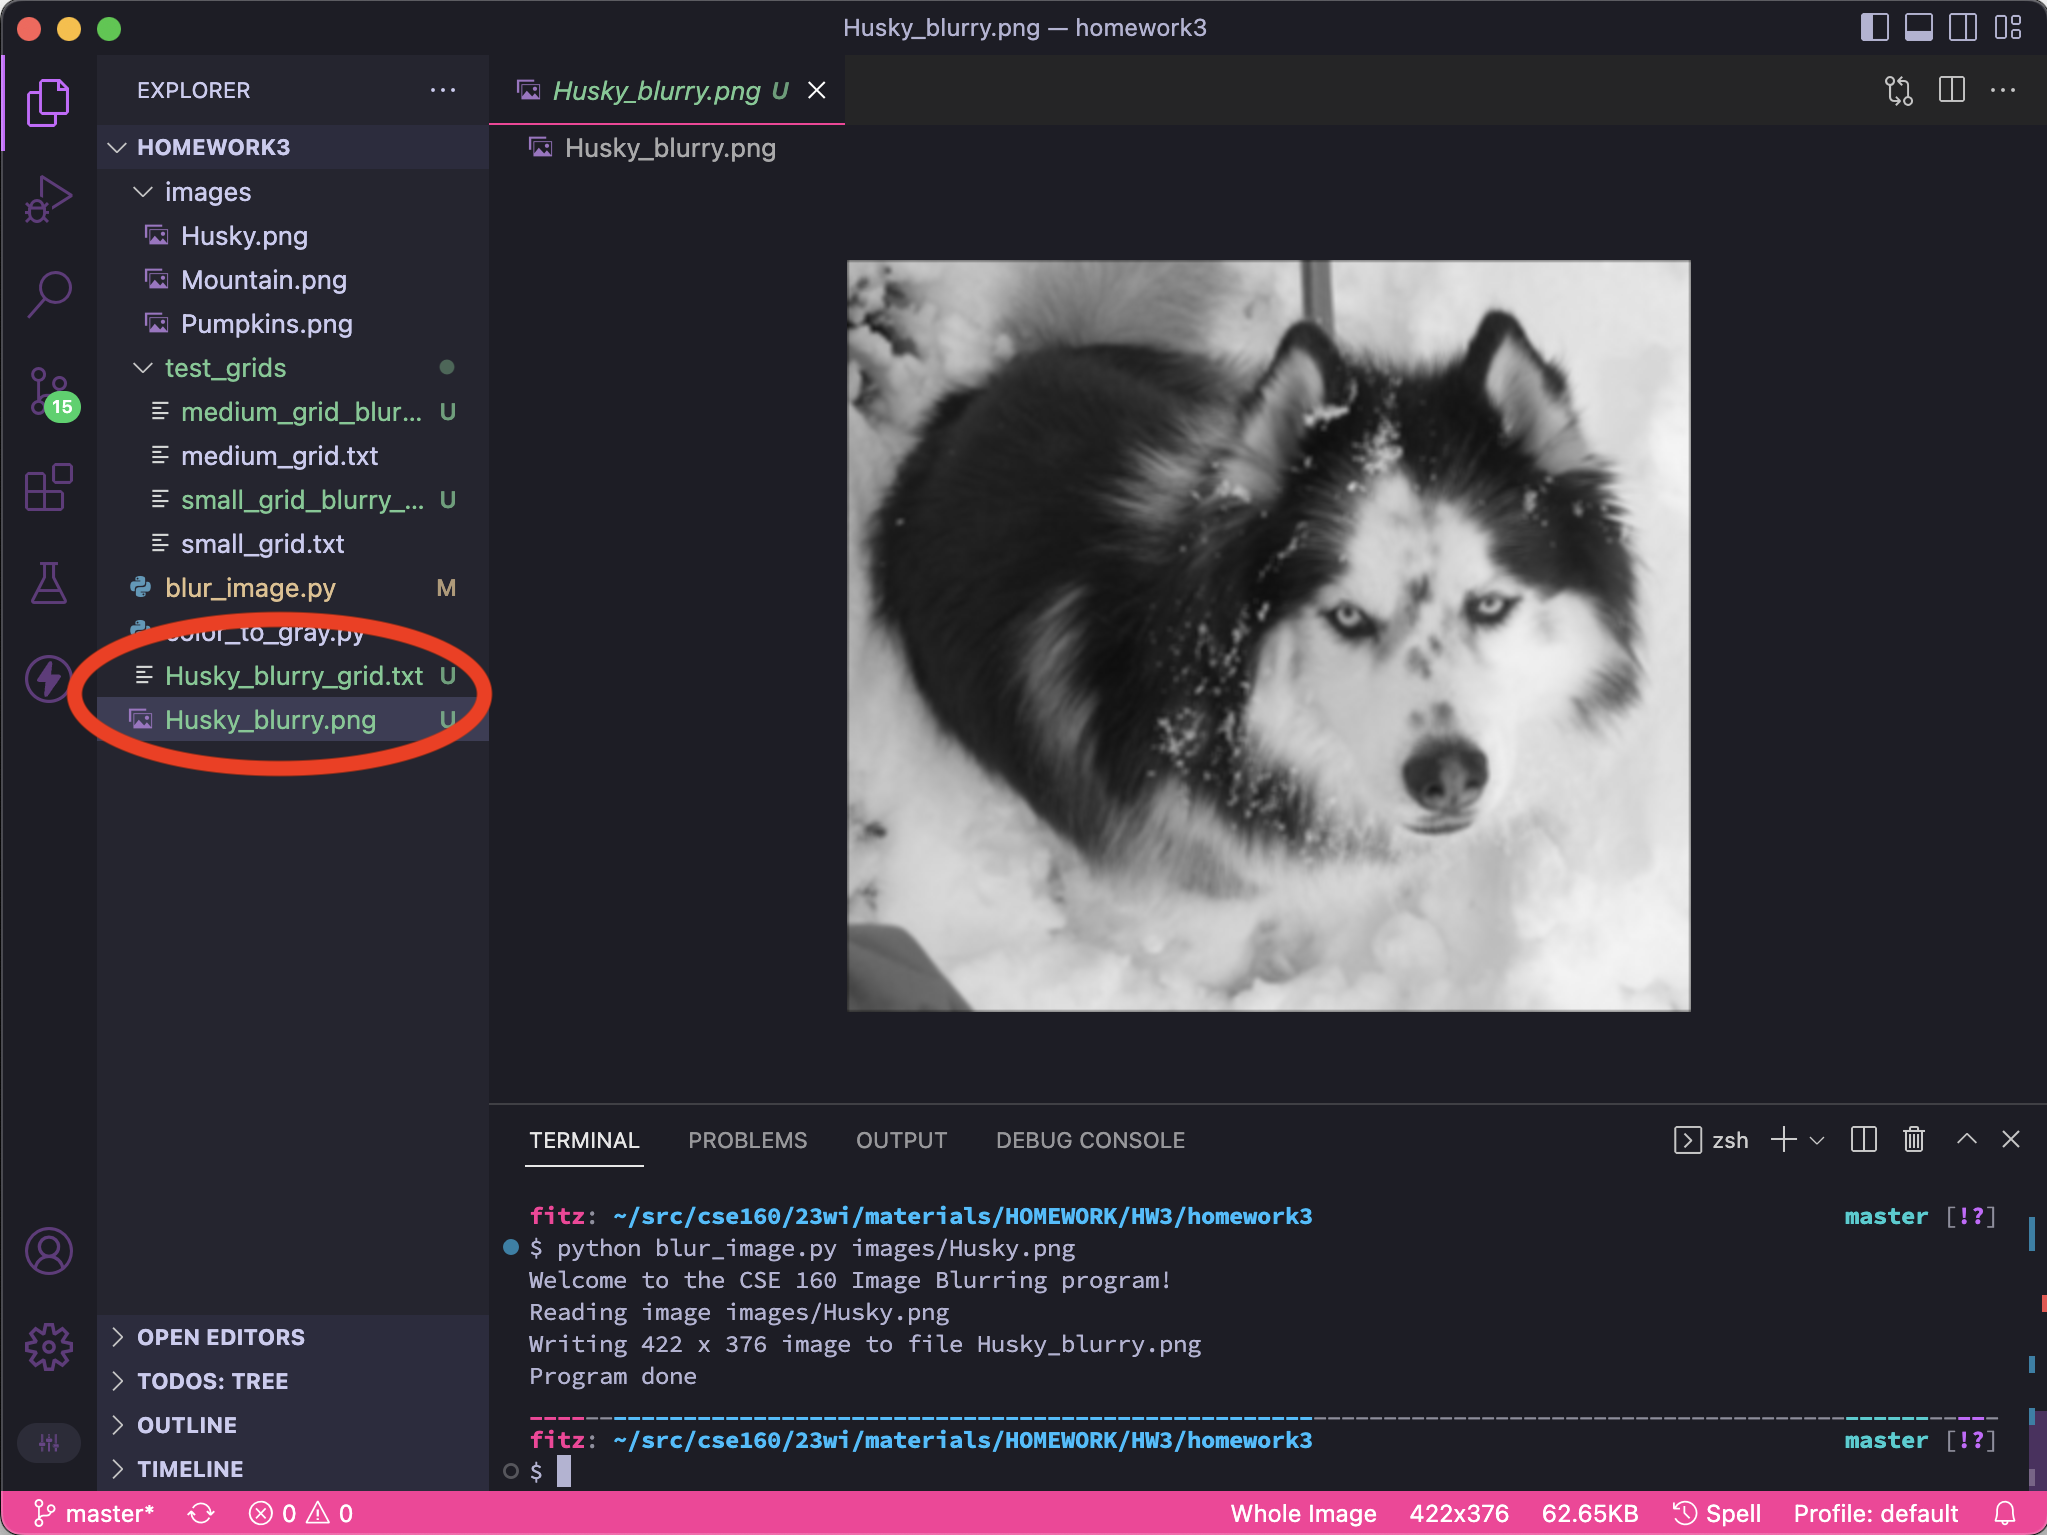
Nice work, you have finished the main program! You should be able to read in .png images, blur them, and write the result to a .png and a .txt file. Try it out by running the command to blur the image of the husky, which we provided in the setup section. The blurred image and blurred grid will be output in your Homework3 folder, and you can open them in VSCode to see the result:
Problem 4: Implement Reading CSV Grids
Finally, for this problem you will implement read_grid(file_path) to allow your program to read in files in our CSV format. Note that you should NOT use any methods from Python’s CSV module to implement this function. Everything you need to know can be found in the lecture slides on File I/O. The code should follow this high-level structure:
- Open the file.
- Read the file one line at a time.
- Use the provided function
csv_line_to_list(line)to convert each line of input into a list of integers. - Create a list of these lists that matches the “grid of pixels” format.
- Close the file and return the grid of pixels.
If you re-read the main program you will notice that read_grid is already called, so you do not need to add any additional code to call the function. Once you implement the body of read_grid, you will be able to run blur_image.py with either a .png image or a file with the .txt extension in our CSV format.
Problem 5: Checking your work
Before submitting this assignment, we recommend that you confirm that your code passes the tests in test_get_pixel_at() and test_average_of_surrounding(). Additionally, you should test that your CSV grid reading and blurring process works by reading in the files in the test_grids folder and comparing your output grids to the corresponding blurred grid.
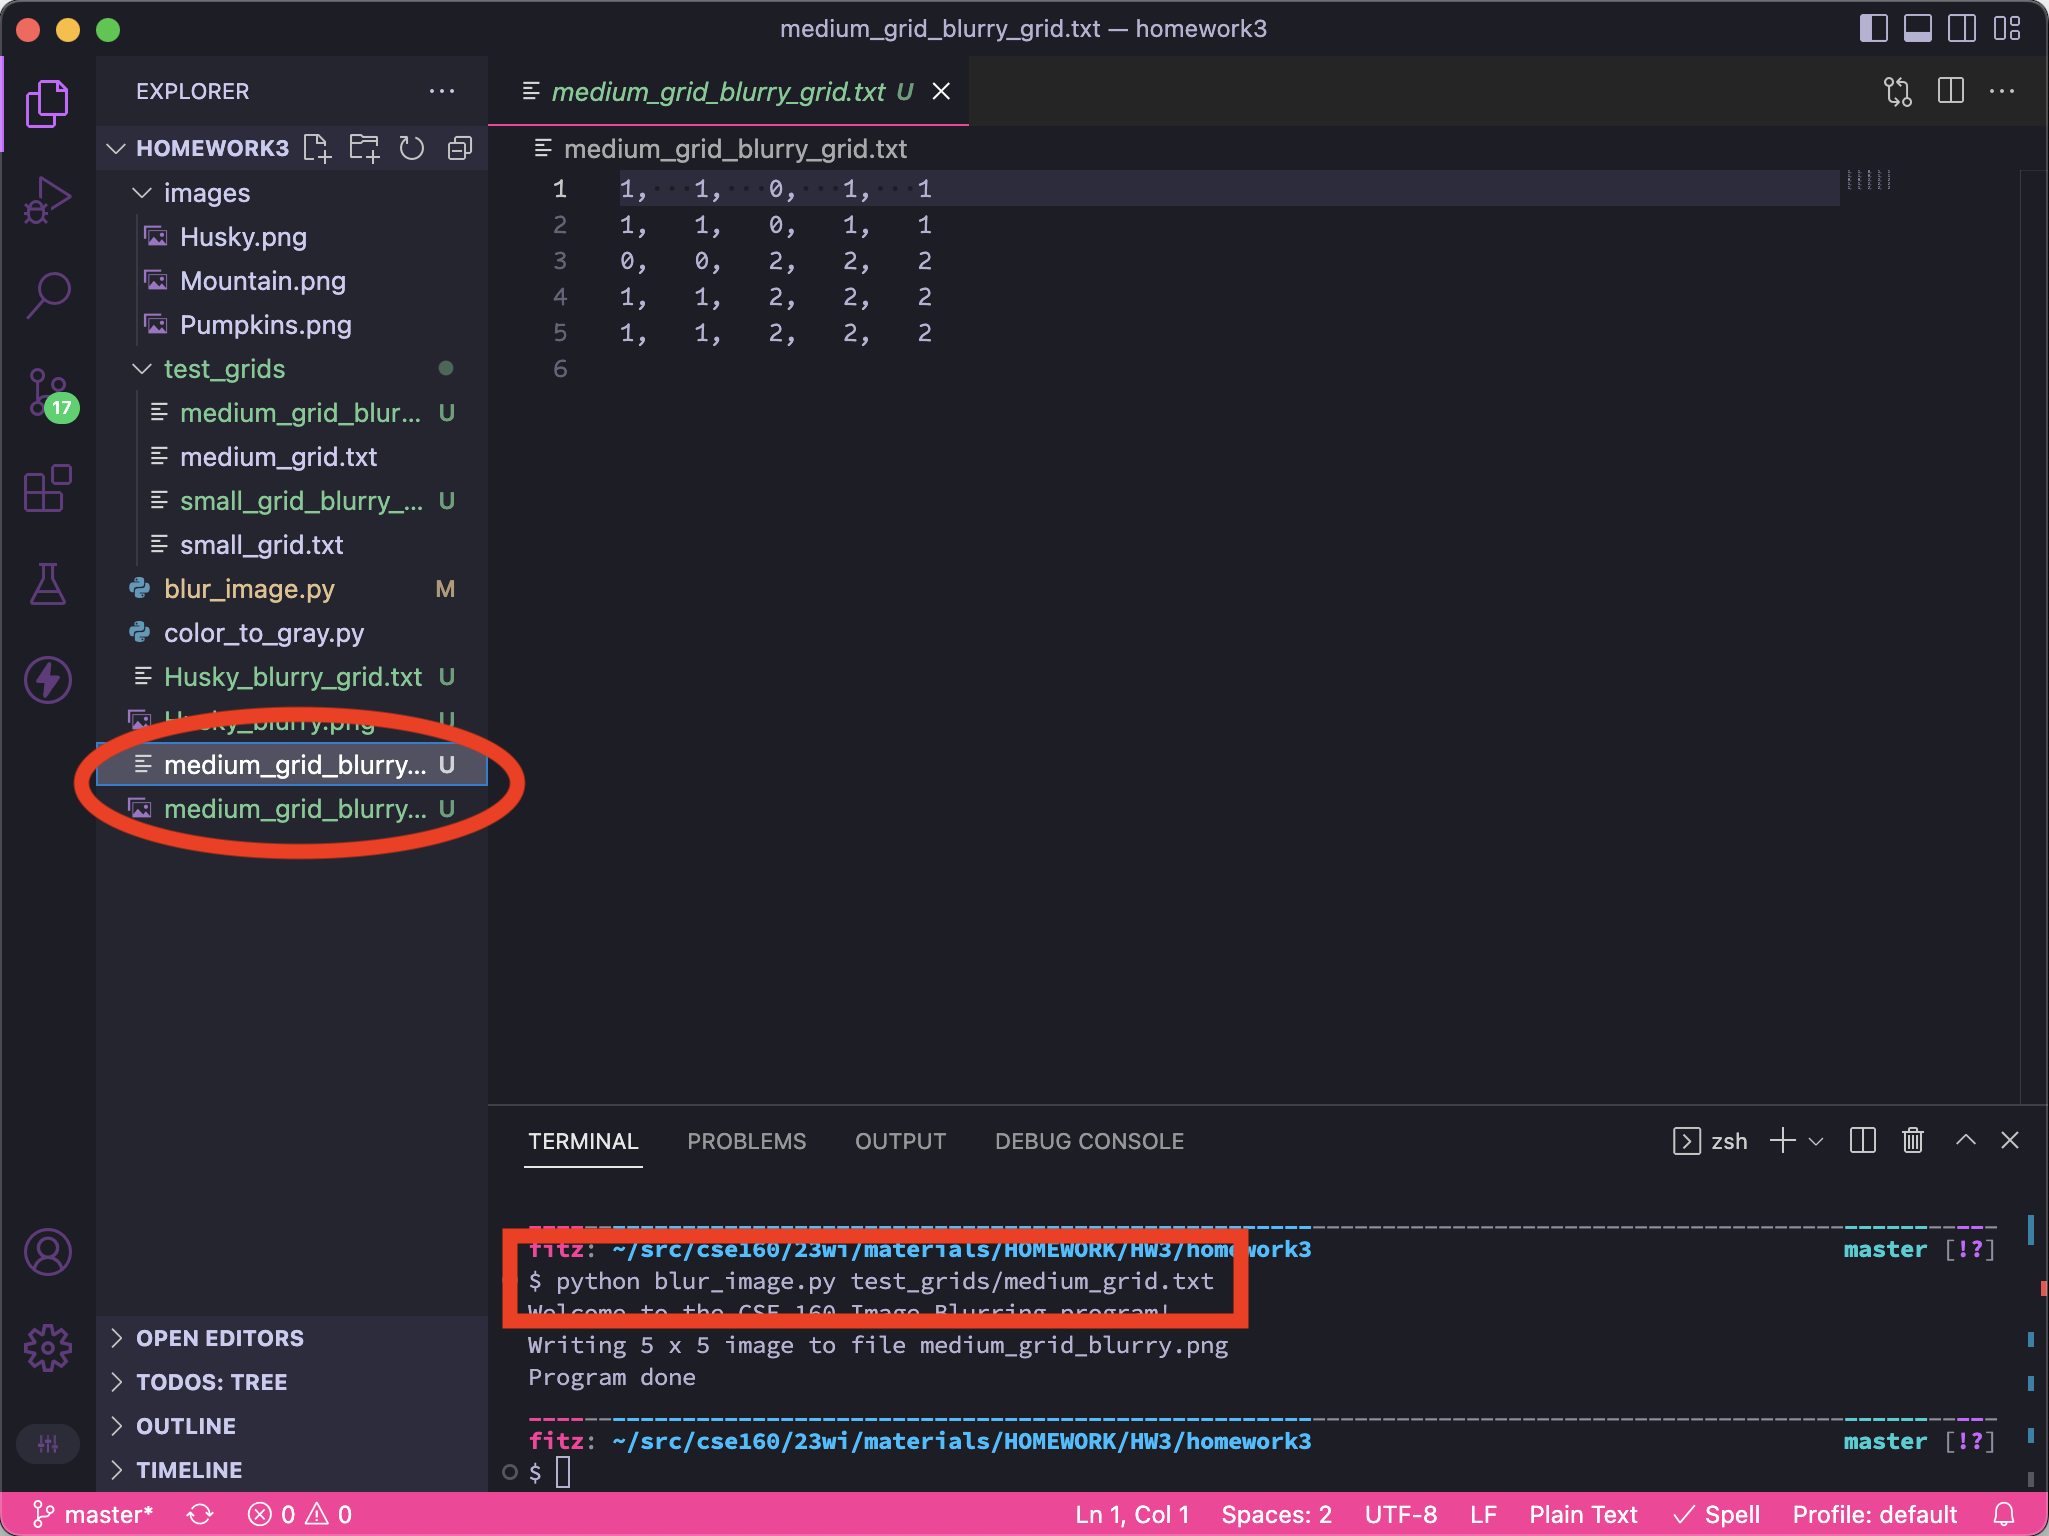
For example, if you run:
- On Mac/Linux:
python blur_image.py test_grids/medium_grid.txt - On Windows:
python blur_image.py test_grids\medium_grid.txt
This should produce a file called medium_grid_blurry_grid.txt in your homework3 directory. You can use the Diff Checker tool from HW2 to compare YOUR file to the file called medium_grid_blurry_grid.txt in the test_grids directory.
Note
The images represented by the files in the test_grids folder are very small - only a few pixels wide. If you try to view them, they will probably show up as a tiny dot. Instead, you will want to compare the produced .txt file to the one in the test_grids folder as described above. If you open up a grid file in an editor, be careful not to modify it. For example, any empty lines (even at the very end of the file) will cause our program to raise an error.
You may also enjoy blurring some of your own images. However, since your program will only accept black and white images you may first need to convert your images to black and white. We have provided color_to_gray.py, a simple Python program that converts color images into black and white .png images. (Use of this program is optional.) To use the program, in either Mac/Linux or Windows type:
python color_to_gray.py MyImage.jpg
where MyImage.jpg is the name of your image (your image can be named anything but should have an appropriate file extension). This will create a new file in your current directory called MyImage_BW.png which can then be passed to blur_image.py. There is no code to write for this problem, unless your testing uncovers a bug that you need to go back and fix :-).